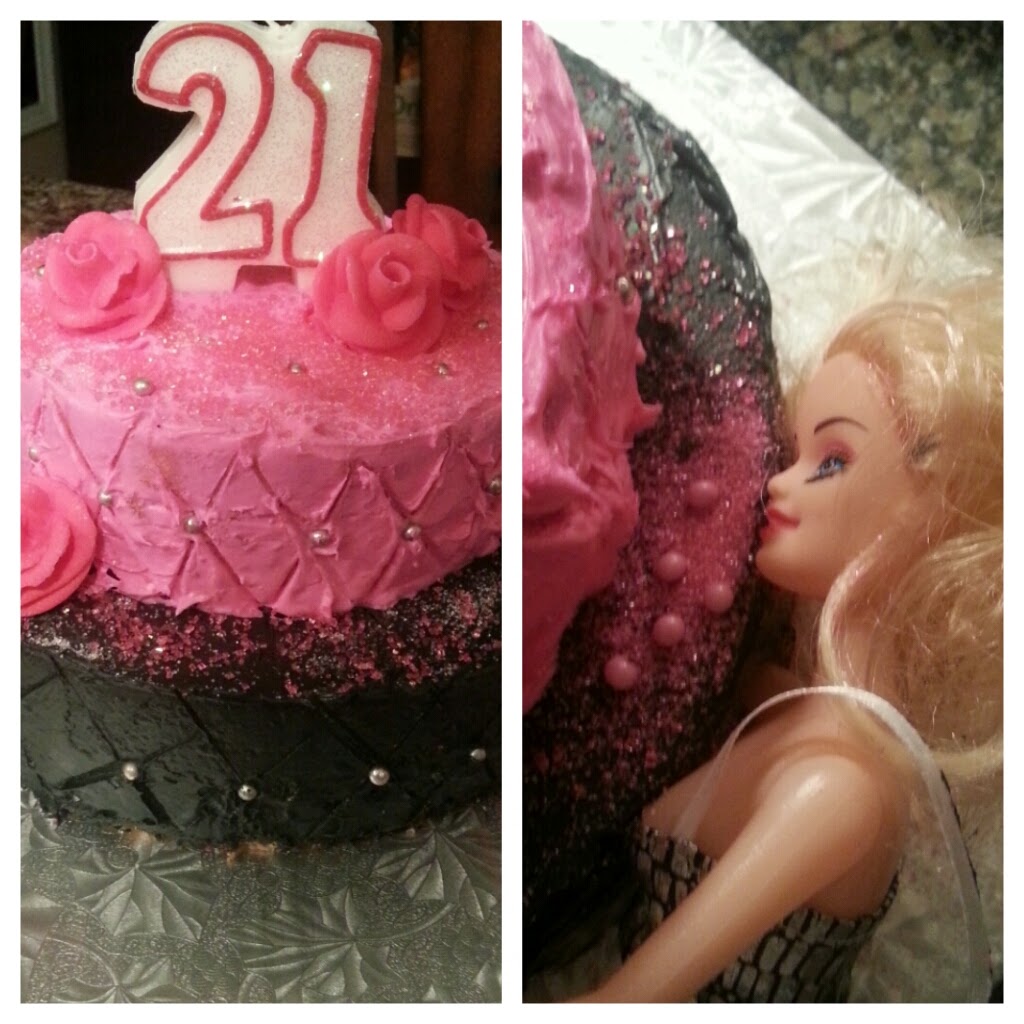
This entry is my version of a drunk barbie cake. I searched and searched for one to emulate and I couldn't find one quite "classy" enough- some people had great ideas like here & here but I didn't know where to search for "mini's" of things and I didn't want the whole cake to look like a drunk mess just in case the birthday girls' parents decided to pop by- this was their little girl still after all.
So, when my friend and fellow cake builder showed me a gorgeous picture of a quilted black and pink cake, I had an idea- what if the front side of the cake looked all pretty and classy, and the back side had a passed out puking (sprinkles) barbie? That way, from the front, it was completely G rated and from the back, the PG started!
Well, the original plan was to make fondant which I've done more than a few times for some more R rated bachelorette cakes (tutorial soon!) so I was completely comfortable with that (find that recipe here). However, you need Time for fondant, and, seeing as how we didn't even bake the cake until late the night before, we didn't have time. So instead, I bought some pre-made icing and we just mixed our food color gel directly into the can. I got most of my baking supplies at Bulk Barn for a great deal!
So, since the birthday girl doesn't like chocolate (I was just as shocked as you are), I found a recipe to make a dense cake that could withstand toppings that was white. I didn't particularly like the taste of the recipe, however, it was great for its cause. I would prefer to use chocolate if I did this again just because I find the shape holds up so dang well.
So, we ended up mixing a hot pink and a black batch of icing. I made a 9" and a 6" cake and iced them separately before stacking them, then my friend fixed up the icing (aka made it smooth and beautiful) and we went on to decorating.
First, my friend stuck the barbie in the back of the cake (we deemed the back by finding the place on the cake with the most flaws lol). She stuck a whole hand in there so she wouldn't slip off the cake. To prep the barbie, we had teased her hair all messy and rubbed mascara below her eyes and removed a shoe.
For the sides of the cake, we wanted to make that coach bag stitched look with "diamonds" at the cross points but I couldn't find a Single tutorial on how to make this in icing- there are plenty for fondant even with some sheets that you just press onto the cake- so little to no work at all! But nothing for icing and especially nothing small enough for our cake (since it was quite mini).
So we did what all great cake procrastinators do- we made it up!
I had just bought a 3 pack of rulers from the dollar store to make my diamond pinata, and had a clean one left over that i washed and then just eyeballed it to make diagonal lines across the cake. It was too easy. I just had to make sure to wipe the ruler after each time or else it would just smear the icing.
My friend followed behind and put little silver coke balls at each cross point. If you wanted this more precise, you could definitely space it out and make a mark every 2cm or 1/2 inch or so and then connect the dots. But I wanted something quicker and I have a pretty decent eye for these things.
Then we simply placed the "21" candle and the store bought roses in a pleasing manner. And we sprinkled hot pink sprinkles all over the top of the cake on each layer. Then, for the "puke," we placed pink coke balls and sprinkles in a pile near barbies mouth. My friend then wrote the birthday girls' name on the board very pretty and we were done.
Make sure to check out the finished cake pictures below and see the end of this post for a quick step by step- make sure to follow my boards on Pinterest to keep updated to my posts and post your own photos if you try this out!


So, here's a shortened how to:
1. Bake a 6 + a 9" cake from a sturdy recipe.
2. Mix your favorite food colorings straight into the store bought canned icing can.
3. Let cakes cool (or do it the lazy (crazy?) girls' way and stick the cakes into your bbq to cool in the middle of winter).
4. Ice cakes separately and then stack them directly onto your finished surface (I just used a store bought for mine).
5. Mess up your barbie- aka make her makeup run down her face and tease her hair then stick her into the cake (or place her gently, up to you.
6. Decorate!
You're done- easy as pie err cake, non? Have fun with it! I am proof that you don't need to have much time or know what you're doing and can still create a pretty awesome cake.
No comments:
Post a Comment